A federal judge on Wednesday sentenced Ryan Wesley Routh, 59, to life in prison plus an additional 84 months for his role in a 2024 attempted assassination of then-former president and GOP nominee Donald Trump, federal prosecutors said.
Routh was convicted by a federal jury in September 2025 on five felony counts, including attempted assassination of a major presidential candidate, assaulting a federal law enforcement officer and multiple firearms offenses, in connection with the September 15, 2024, incident at the Trump International Golf Club in West Palm Beach, Florida.
Prosecutors said Routh concealed himself with a rifle in shrubbery near the golf course and aimed at Trump and a Secret Service agent before agents intervened. He fled the scene and was later arrested nearby.
At the sentencing hearing, U.S. District Judge Aileen M. Cannon imposed the maximum penalty for the attempted assassination and related charges, rejecting the defense’s request for a reduced term.
Cannon said Routh’s conduct “undeniably warrant[s] a life sentence.”
“He took steps over the course of months to assassinate a major Presidential candidate, demonstrated the will to kill anybody in the way, and has since expressed neither regret nor remorse to his victims,” she wrote.
Attorneys for Routh have indicated they plan to appeal the sentence.
The Department of Justice said the sentence reflects the seriousness of attempting to kill a presidential candidate and is intended as a strong deterrent against political violence.
Lead federal prosecutor John Shipley said the government presented a “mountain of evidence” showing “how close he got to actually pulling this off.”
The incident in Florida was the second attempt on Trump’s life in 2024. In July, a gunman opened fire during a Trump campaign rally in Butler, Pennsylvania, resulting in one death and several injuries, including Trump himself. The shooter, identified as 20-year-old Thomas Crooks, was killed at the scene by law enforcement.
The apparent threats to Trump have continued as president.
He rapidly boarded Air Force One using a smaller staircase in October due to “increased security measures” at Palm Beach International Airport, at the time.
The enhanced precautions were implemented after the Secret Service discovered a suspected hunting stand on Friday near the airport that had a clear line of sight to the presidential aircraft during Trump’s arrivals and departures.
Fox News was the first to report the discovery of the possible sniper position. No arrests have been made in connection with the incident. FBI Director Kash Patel said an investigation was already underway, adding that the position had yet to be attributed to anyone.
“Prior to the President’s return to West Palm Beach, USSS discovered what appeared to be an elevated hunting stand within sight line of the Air Force One landing zone,” Patel told Fox News Digital.
“No individuals were located at the scene. The FBI has since taken the investigatory lead, flying in resources to collect all evidence from the scene, and deploying our cell phone analytics capabilities,” he added.
USSS Chief of Communications Anthony Guglielmi confirmed to Fox that the agency is “working closely” with the FBI and local law enforcement in Palm Beach County.
He added that agents discovered the alleged hunting stand during their “advance security preparations” prior to Trump’s arrival in Palm Beach.
“There was no impact to any movements, and no individuals were present or involved at the location,” Guglielmi told Fox. “While we are not able to provide details about the specific items or their intent, this incident underscores the importance of our layered security measures,” he said.
The investigation came just weeks after Routh was convicted of attempting to assassinate Trump. Prosecutors said Routh had set up a sniper’s nest in bushes along a fence line overlooking the course before being apprehended by Secret Service agents.
Taking popular dessert items and making them miniature in size seems to be a trend these days for bakers. It may or may not make for a more meticulous baking process, but it adds a certain visual element to the dish and will help with portion control. Walk into any bakery or pastry shop and you'll likely see the display case filled with bite-size sweet treats.
Lilly Childers, a home chef who's shared a handful of recipes on YouTube, has jumped on this finger food trend. She recently featured a recipe for mini banana cream pie cookie cups on her channel. If you're as intrigued by this as we were, grab a bunch of bananas and follow along.
Advertisement
To get this recipe rolling, fill the cupcake holders with balls of cookie dough and bake. Don't forget to spray the pan with anti-stick coating of some sort.
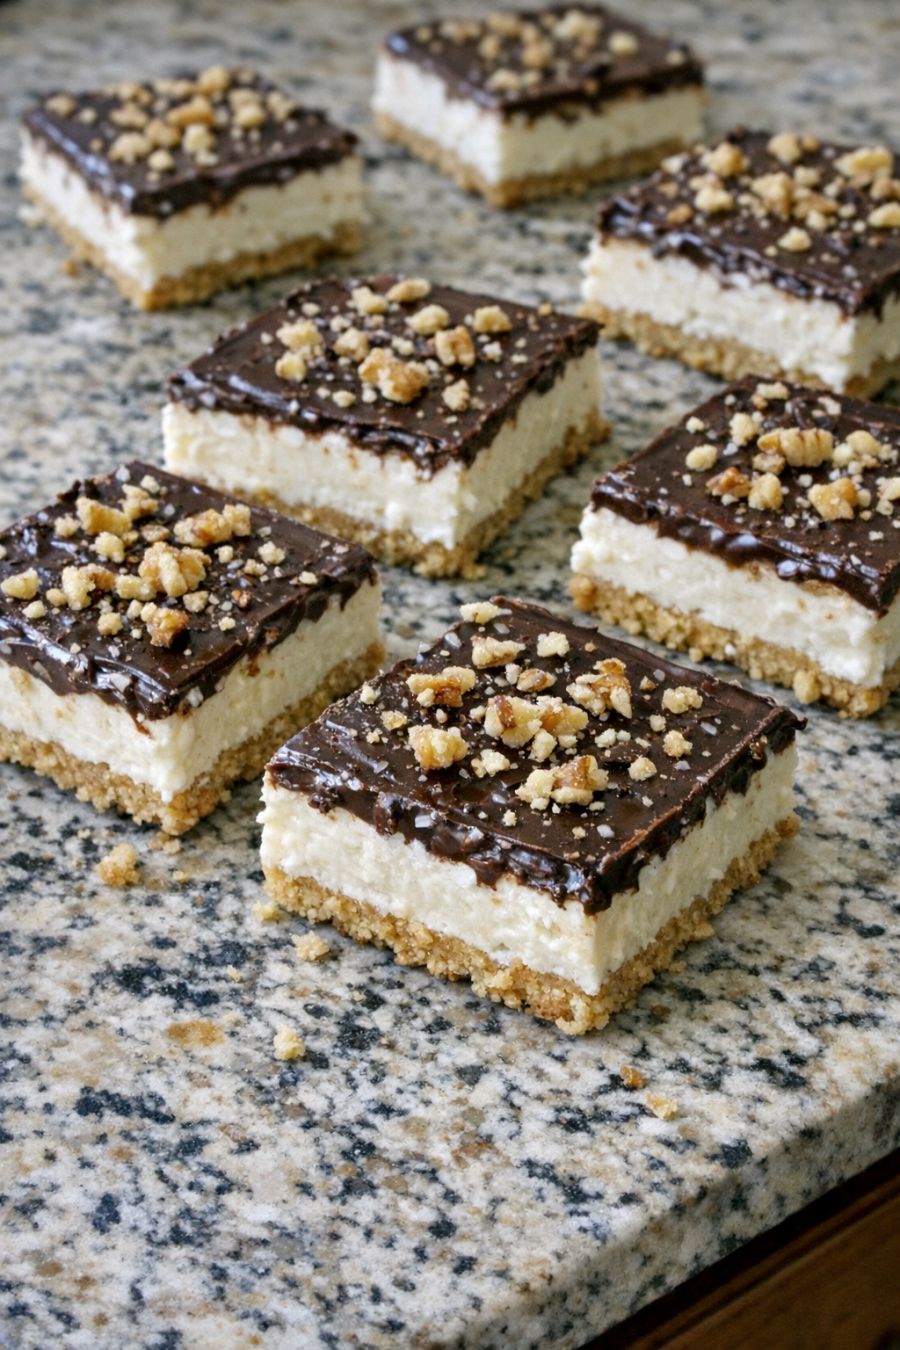
This little 5-ingredient chocolate cream icebox square recipe is the kind of dessert I lean on when life is busy but I still want something special on the table. Icebox desserts go way back to the days when home cooks made magic with simple pantry staples and a refrigerator instead of a fancy oven. These squares are cool, creamy, and chocolatey, with just enough crunch from the cookie crust to keep things interesting. They’re perfect for potlucks, Sunday dinners, or those nights when you want a treat but don’t want to heat up the kitchen. You can make them ahead, tuck the pan in the fridge, and feel a little smug knowing dessert is already done.
These chocolate cream icebox squares are lovely all on their own, but a few simple touches can turn them into a full dessert spread. I like to serve them with a bowl of fresh berries—strawberries, raspberries, or even sliced bananas—so everyone can add a little fruit on top if they’d like. A small scoop of vanilla ice cream or a glass of cold milk is especially nice for kids, while coffee or decaf after dinner pairs beautifully for the grown-ups. If you’re serving these at a gathering, you can cut the squares small and set them out on a platter alongside some salty snacks like pretzels or mixed nuts; the sweet-and-salty combo keeps people coming back for “just one more” square.
Advertisement
5-Ingredient Chocolate Cream Icebox Squares
Servings: 12 squares
Ingredients
2 cups chocolate cookie crumbs (from chocolate graham crackers or chocolate wafer cookies, finely crushed) 1/2 cup (1 stick) unsalted butter, melted 2 cups cold heavy whipping cream 1 (14-ounce) can sweetened condensed milk 1 1/2 cups semisweet chocolate chips (or chopped chocolate), melted and slightly cooled
Directions
Prepare the pan: Lightly grease or line an 8x8-inch or 9x9-inch baking pan with parchment paper, leaving a little overhang on two sides so you can lift the squares out easily later.
Make the crust: In a medium bowl, stir together the chocolate cookie crumbs and melted butter until the mixture looks like damp sand and holds together when pressed. Pour into the prepared pan and press firmly into an even layer using the bottom of a measuring cup or your fingers. Pop the pan into the fridge while you make the filling.
Melt the chocolate: In a microwave-safe bowl or using a double boiler, gently melt the chocolate chips until smooth, stirring often so they don’t scorch. Let the melted chocolate cool to just warm (you still want it pourable, but not hot) so it doesn’t deflate the cream later.
Whip the cream: In a large, cold mixing bowl, beat the heavy whipping cream with an electric mixer on medium-high speed until soft peaks form. (Soft peaks will gently curl over when you lift the beaters.) Be careful not to overbeat.
Add the sweetened condensed milk: Pour the sweetened condensed milk into the whipped cream and beat on low speed just until combined. The mixture will loosen slightly but should still be thick and creamy.
Make the chocolate cream: Slowly drizzle the cooled melted chocolate into the cream mixture while beating on low speed, scraping down the sides of the bowl once or twice. Mix just until everything is evenly combined and the mixture is a smooth, light chocolate cream.
Assemble the dessert: Take the pan with the chilled crust out of the fridge. Pour the chocolate cream filling over the crust and spread it out into an even layer with a spatula, smoothing the top as best you can.
Chill to set: Cover the pan loosely with plastic wrap or foil and refrigerate for at least 4 hours, or overnight if you can. The longer chill time helps the squares firm up and makes them easier to cut.
Slice and serve: When you’re ready to serve, use the parchment overhang to lift the dessert out of the pan, if using. Cut into 12 squares (or smaller pieces if serving a crowd). Wipe your knife with a warm, damp cloth between cuts for neat slices.
Store leftovers: Keep any leftover squares covered in the refrigerator for up to 3–4 days. They actually taste even better on day two, once the flavors have had more time to mingle.
Advertisement
Variations & Tips
For picky eaters or different tastes, there are plenty of easy ways to customize these icebox squares without making things complicated. If someone in your house isn’t a big fan of dark chocolate, use milk chocolate chips instead for a sweeter, milder flavor. You can also swap the chocolate cookie crumbs for regular graham crackers or even vanilla wafers to tone down the chocolate and make the filling the star. For a fun kid-friendly twist, sprinkle mini chocolate chips or crushed cookies over the top before chilling so the kids feel like they’re getting a little extra treat. If you need a nut-free dessert for school events, just be sure to choose cookies and chocolate that are labeled nut-free; on the flip side, if your crew loves nuts, you can stir a small handful of finely chopped toasted pecans or walnuts into the crust for extra crunch. To lighten things up a bit, you can replace half of the heavy cream with very cold evaporated milk and whip it the same way—just know the texture will be a little softer. For a fancier version, layer sliced strawberries or bananas between the crust and the chocolate cream, then top with a dusting of cocoa powder right before serving. And if you’re serving a mixed-age crowd, you can even set up a simple topping bar with bowls of berries, sprinkles, and crushed pretzels so everyone can decorate their own square and make dessert feel like a little celebration.
Does it ever seem like you're running out of room for everything in your house? Short of throwing out all of your possessions, is there any other option? Of course! Just head out to Walmart and buy a few plastic bins.
With these bins, you can save space in any room of your house. Just decide the best location for each bin, fill it with anything that fits (and belongs together) and place it somewhere out of the way. No matter what you need to store, you can likely find a bin in a corresponding size. If you're still not sure that plastic bins are the best storage option for you, check out a few things you can do with them.
Advertisement
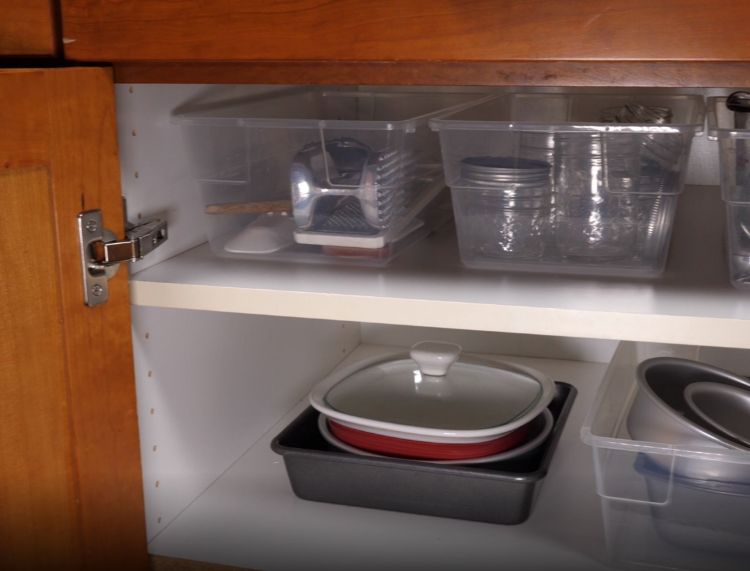
1. Kitchen pullouts
Keeping your kitchen organized is no small task. But with a few of these bins, you can quickly group certain items and utensils together and store them in easy-to-reach places. Put all of your Tupperware into one, lids in another and baking necessities in another. The possibilities are endless and you'll never again have to search every cabinet for that one lid you need.
Like Tips for the Home for more
Cooktop Cove
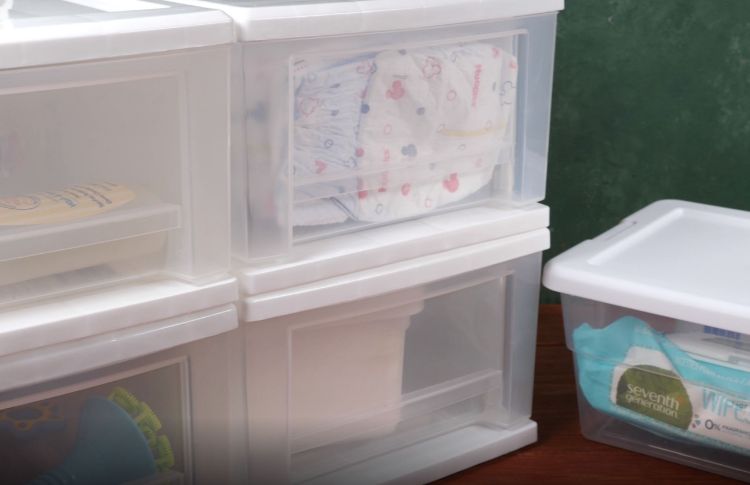
2. Extra nursery items
If you have a baby, you probably have diapers, bottles, wipes and pacifiers stashed throughout your house. But what do you do with all of the extra stuff that you won't need to use for a while? Instead of piling any extra items in a corner and ignoring them, store them in a clear bin. You can tuck the bin away under a crib or in a closet to keep it out of the way and you can easily see inside to determine when you need to buy more of something.
Cooktop Cove
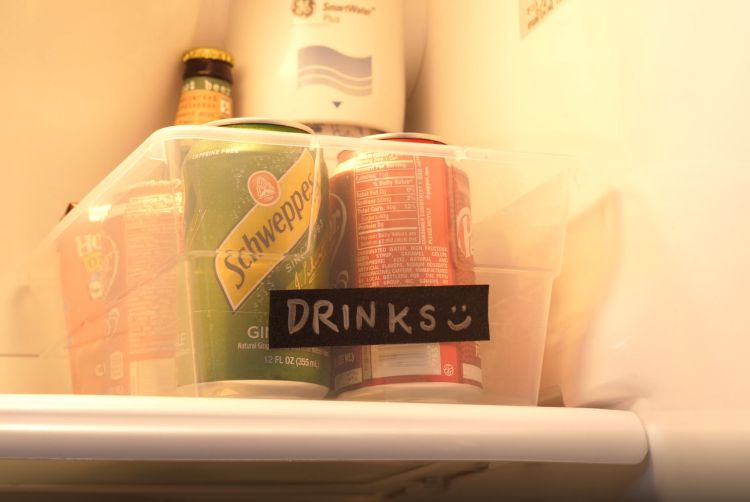
3. Food storage
Instead of haphazardly shelving food in your pantry, try grouping similar items together and storing them in plastic bins. This will save space and make it easy to see what is in each bin. You can even have a separate "Eat Me First" bin (in your pantry or refrigerator) for food that's close to its expiration date.
Cooktop Cove
4. Bathroom bins
Bathrooms are short on extra room to begin with and the space only grows more cramped if you share a bathroom with family members or roommates. Instead of fighting for space, give each person his or her very own plastic bin. Now everyone's stuff has a designated space, and you can stack the bins under the sink to free up some counter space.
Cooktop Cove
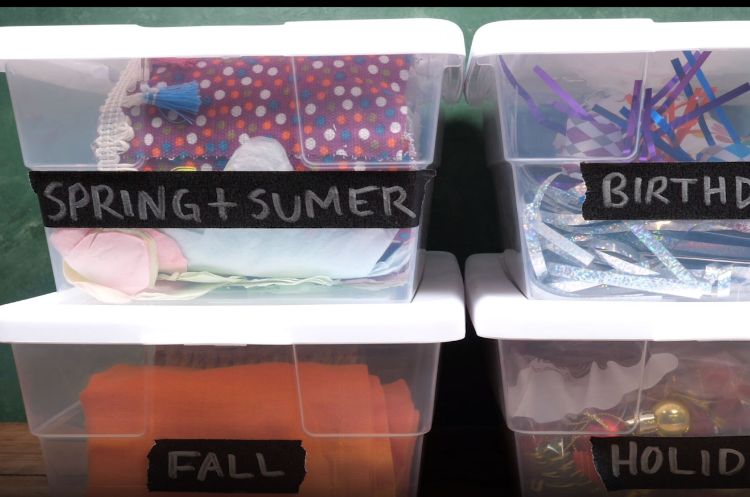
5. Out-of-season decorations
What's better than a house covered in Halloween or Christmas decorations? Nothing beats that, right? Unless, of course, it's the middle of April. Then those decorations might be just a bit out of place. But where to put them? The garage is already full and there's no way everything will fit in the basement. Instead of just leaving decorations up all year to avoid making space for them, store them in labelled plastic bins. Now everything will be right where you need it when the next holiday rolls around.
Cooktop Cove
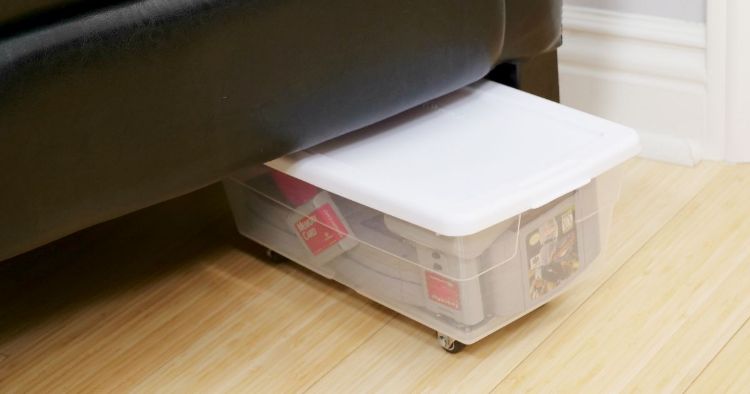
6. Rolling drawers
If you're short on space in your bedroom or living room, try utilizing the space underneath your bed or couch. Attach 1-inch casters to the bottom of your bins so you can easily roll them out from underneath whenever you need something out of one of them.
Cooktop Cove
7. Lego table
Do you have kids or are you a kid at heart? Then you probably need somewhere to store and play with all of those Legos you've spent years accumulating. By stacking a few plastic bins on top of each other you can create the legs of a table perfect for your Lego creations. If you're feeling really ambitious, you can even sort the Legos by color.
Cooktop Cove
8. Classroom supplies
If you're a teacher, you know the frustration of never knowing where your markers, sticky notes, glue or scissors have disappeared to. Instead of constantly trying to track down your missing supplies, use several smaller-sized bins to organize your classroom supplies. With everything labelled, your students will know where to find what they need and will also know exactly where to return things when they're finished using them.
Cooktop Cove
9. Toy storage
Kids tend to make messes. They can't help it; it's just what they do.
Cooktop Cove
But that doesn't mean you should let their toys take over the entire room. Plastic bins are the perfect storage containers for kids' toys. They can hold a lot, you can use just about anything to label them and your kids can easily see what toys are in each bin.
Cooktop Cove
10. Jewelry box
Whether you make jewelry to sell or just like to have plenty of options for a night out, storing jewelry is always a hassle. Your necklace chains get tangled together, your bracelets lose their beads in the fray and your rings disappear into the great unknown. Instead of digging through a crowded jewelry box every time you need something to wear, try drilling some holes into the sides of your plastic bin and inserting metal pegboard hooks. You can now safely hang your jewelry on the hooks without everything becoming a huge tangled mess.
In today's modern society, we've become more and more dependent on technology in everyday life. Fancy appliances like the Instant Pot and air fryer entered our kitchens. The electric toothbrush came into our bathrooms, TVs in our living room, and electricity is even coming to our cars.
And with each passing day, we seem more and more inseparable from our smartphones and laptops. (Believe it or not, Steve Jobs first showcased the iPhone just 15 years ago.)
Advertisement
But does technology teach us actual life skills or how to actually -do- tasks?
Shutterstock
Ask a young man or woman today and needless to say they probably don't know how to cook or do laundry as well as past generations at the same age.
Shutterstock
This likely became even more pronounced as a result of COVID and the recent pandemic.
Shutterstock
More and more parents want to see home economics re-introduced to schools. What would be taught in these courses?
Not just cooking but also practical skills like understanding how to manage finances (i.e. paying monthly bills or taxes) or learning more about nutrition. As the saying goes, we are what we eat.
Shutterstock
Imagine a sewing class so your child knows how to resew back a lost button or a gardening class where a kid can learn how to grow fresh herbs. This is not to say that the standard math, reading, science, and history aren't important. But what is being taught in schools may simply be not enough.
Shutterstock
According to the latest US Census data from 2021, 94 million Americans ages 25 and older have an associate degree or higher. That's about 42% of the population in that age demographic. Women accounted for more of the college educated population than men. As more and more folks go to college, how many actually have developed the necessary life skills necessary to survive on their own?
Cooking nutritious meals, maintaining a clean dorm room, and doing laundry are more likely to happen if students are equipped with the skills to do so in the first place.
Shutterstock
Advertisement
A home economics course could help students learn basic life skills such as changing a flat tire or a lightbulb. Having dedicated time at school to learn this along with other students would provide an optimal environment. Otherwise, the burden lies at home with the parents.
Whether you are looking for a healthier recipe that's also kid-friendly or you have a craving for something sweet late at night, this easy recipe will undoubtedly please you. Introducing the Super Easy Berry Banana Muffins! These delightful muffins bring together the best of both worlds: the deliciousness of sweet berries and the natural goodness of ripe bananas. Whether you're a health-conscious individual seeking a nutritious yet indulgent treat or someone in need of a quick and tasty dessert option, these muffins have got you covered.
What makes this recipe truly remarkable is its simplicity. With just 3 main ingredients, you can whip up a batch of these mouthwatering treats in no time. The combination of the tangy berries and the naturally sweetened mashed bananas results in a moist and flavorful muffin that will leave you and your loved ones coming back for more. Plus, the convenience of using pantry items takes away any hassle, making it a perfect choice for busy individuals or those new to baking.
Advertisement
Super Easy Berry Banana Muffins
Like Cooktop Cove for more
Cooktop Cove
Ingredients
You will need two ripe bananas, four eggs and a container of your favorite berry.
Directions
1. Heat your oven to 375 degrees Fahrenheit and grab two ripe bananas. Make sure the bananas have some brown spots for a sweeter result. When a banana is ripe the starch converts to sugar, which makes the bananas sweeter (and eliminating the need for sugar in this recipe).
2. Mash your bananas with a fork in a medium-sized bowl.
3. After your bananas are completely mashed, add three eggs to the mixture and whisk well.
4. Set your banana mixture aside and pull out your muffin tin. Make sure to spray the pan to keep the muffins from sticking and a few of your favorite berries to each tin.
5. Next, pour the banana mixture over the berries, filling each cup. Tap the pan gently on the counter to get rid of any air bubbles and place in your heated oven.
6. Your muffins should take about 12 minutes to bake at 375 degrees Fahrenheit. Check the muffins at about 10 minutes if your oven cooks a bit faster.
Advertisement
7. Let your muffins cool for about five minutes before enjoying with a glass of cold milk. While this video uses raspberries, consider trying blackberries or blueberries for a different flavor mix.
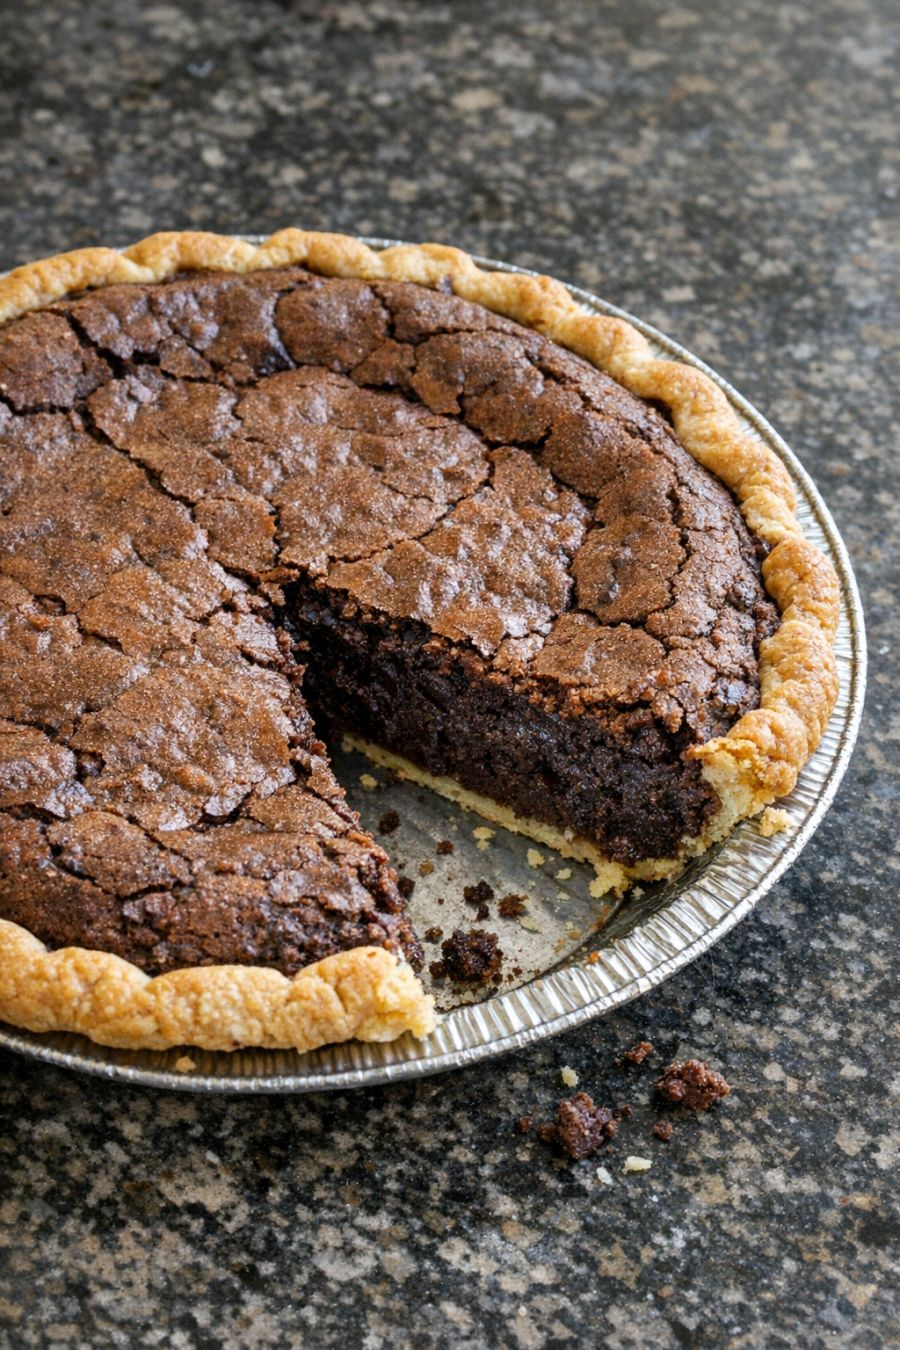
This 5-ingredient fudgy brownie pie is what I make on the nights when I want something homemade and chocolatey, but my brain is already clocked out from work and kid schedules. It’s basically a rich, gooey brownie baked in a pie dish, so it feels a little more special than a pan of brownies but takes about the same effort. Brownie pie has been around forever in potluck-land here in the Midwest—someone’s aunt always brings one to the church basement or school fundraiser—and it’s loved because it slices like pie but eats like a fudgy brownie. You only need one bowl, a handful of pantry ingredients, and about 10 minutes of hands-on time. It’s the perfect last-minute dessert when you remember at 3 p.m. that you volunteered to “bring something sweet.”
This fudgy brownie pie is fantastic just slightly warm with a scoop of vanilla ice cream—it melts into the cracks and makes it extra gooey. If you’re serving it after a heavier dinner (like pasta or a casserole), keep it simple with just a dusting of powdered sugar and a few fresh berries to lighten things up. For a more dressed-up dessert spread, pair it with coffee or a little espresso, and maybe set out a bowl of whipped cream so everyone can top their own slice. It also travels well, so it’s a great choice for potlucks or game nights; just bake it in a pie dish with a lid or cover it tightly with foil, and you’re good to go.
Advertisement
5-Ingredient Fudgy Brownie Pie
Servings: 8
Ingredients
1/2 cup (1 stick) unsalted butter, melted 1 cup granulated sugar 2 large eggs 1/2 cup unsweetened cocoa powder 1/2 cup all-purpose flour Optional: pinch of salt and 1 teaspoon vanilla extract (not counted in the 5 core ingredients, but nice to add)
Directions
Preheat your oven to 350°F (175°C). Lightly grease a 9-inch pie dish with butter or nonstick spray.
In a medium mixing bowl, whisk together the melted butter and sugar until well combined and slightly glossy.
Add the eggs one at a time, whisking well after each addition until the mixture is thick and smooth. If using, stir in the vanilla extract and a pinch of salt.
Sift or stir in the cocoa powder and flour. Use a spatula or wooden spoon to gently fold the dry ingredients into the wet ingredients just until no dry streaks remain. The batter will be thick and fudgy—try not to overmix.
Scrape the batter into the prepared pie dish and spread it into an even layer, smoothing the top with your spatula.
Bake for 20–25 minutes, or until the edges are set and a toothpick inserted about 2 inches from the edge comes out with a few moist crumbs (the center should still look slightly soft for a fudgy texture).
Let the brownie pie cool in the dish for at least 15–20 minutes before slicing. It will firm up as it cools. Serve warm or at room temperature, plain or with your favorite toppings.
Advertisement
Variations & Tips
To make this brownie pie your own, you can stir in 1/2–3/4 cup of chocolate chips, chopped nuts, or even crushed pretzels right before baking for extra texture and flavor. If you like things a little more decadent, swirl 2–3 tablespoons of peanut butter or Nutella over the top of the batter with a knife before it goes into the oven. For a slightly less sweet version, reduce the sugar to 3/4 cup and add an extra pinch of salt. If you need to prep ahead, bake the pie the night before, let it cool completely, then cover tightly and store at room temperature; rewarm slices in the microwave for 10–15 seconds to bring back the fudginess. You can also turn this into mini brownie pies by dividing the batter among greased muffin cups and baking for 12–15 minutes—great for portion control and lunchbox treats.
°454 grams rotini (elbow or spaghetti can be substituted) °1/2 teaspoon kosher salt °2 tablespoons of butter °2 tablespoons olive oil °1 tbsp garlic (minced from the jar) °1 medium green bell pepper °1 medium onion (white or yellow) °227 grams mushrooms, sliced °1/2 teaspoon kosher salt °1/2 teaspoon black pepper °A bowl with a capacity of °1/2 liter containing 3/4 liter containing grated cheese (Mozzarella, Italian Blend or Cheddar) A cup with a capacity of 60 ml containing sour cream °A bowl with a capacity of °794 grams of red pasta sauce A bowl with a capacity of °1/2 liter containing 3/4 liter containing grated cheese (Mozzarella, Italian Blend or Cheddar)
*Preparation
Using a hand blender or immersion blender, blend 3 ingredients until blended. Bring water to a boil, add salt and pasta and cook according to instructions. Use 2 cups butter and grease a 9 x 12 pan. Dice the green pepper and onion. Slice the mushrooms. Heat 2 cups garlic oil and sauté peppers, onions and mushrooms over medium heat for 3-4 minutes. Drain pasta and set aside. Add chopped and crumbled sirloin. Add salt and pepper, dividing the beef into small bites. Continue cooking until beef is no longer pink, drain off excess fat. Add the jar of pasta sauce and reheat. While the meat sauce cooks, add the softened cream cheese, sour cream and cottage cheese to a medium mixing bowl. Using hand mixer , blend 3 ingredients until well mixed. Layer 1/2 dough in a baking dish, add cheese mixture and smooth evenly over pasta. Add the rest of the pasta, followed by the red meat sauce. Cover the dish with foil and bake for 20 minutes (I spray the oil on my foil so it doesn’t stick). Removing foil and adding grated cheese on top. Return to the oven for 10-15 minutes until the cheese is melted. Rest for 5 minutes before serving
Have you ever blinked a few extra times just to “clear” your vision—only to realize the fog is still there? Have your eyes started feeling dry by mid-afternoon, like they’re quietly begging for a break? Or maybe night driving looks harsher than it used to, with lights that flare and shimmer. If any of that sounds familiar, you’re not alone. Many adults notice subtle vision changes with age, and even small discomfort can feel like a big loss. Because it’s not just eyesight—it’s independence, confidence, and the ability to enjoy details you love.
Quick self-check: On a scale of 1–10, how clear and comfortable do your eyes feel right now? Hold that number. You’ll come back to it when you see the most realistic “next step” in this article.
Why Eye Discomfort Often Increases With Age
Your eyes are exposed to the world all day. Screens, dry indoor air, wind, pollen, UV light, and long hours of focusing can all strain the ocular surface. As you get older, tear production and tear quality can shift, making dryness and irritation more common. At the same time, oxidative stress and inflammation may play larger roles in how eye tissues age.
You might be thinking, “I use drops—why do I still feel dry?” Because some approaches soothe symptoms without addressing lifestyle triggers or overall antioxidant intake. That doesn’t mean drops are bad. It simply means the bigger picture matters: hydration, environment, nutrients, sleep, and inflammation balance.
Now here’s where onions enter the conversation—carefully. Not as a cure, not as a replacement for eye care, but as a food with intriguing compounds that may support overall eye wellness. And the most famous compound is a mouthful with a simple effect: quercetin.
STOP: One Important Safety Truth Before We Go Further
If you remember only one thing from this article, let it be this: Do not put onion juice directly into your eyes. Even though some animal research explores topical applications under controlled conditions, human eyes are sensitive. Onion juice can irritate, inflame, and worsen symptoms—especially if your eyes are already dry. So the focus here is dietary use and gentle, realistic lifestyle support.
Now that the line is clear, we can explore what onions may offer—without the risky shortcuts.
Why Onions Are Getting Attention Again
You know the sharp sting when you chop an onion? That reaction comes from sulfur-containing compounds releasing into the air. But onions also contain a powerful flavonoid called quercetin, especially in red and yellow varieties. Quercetin is studied for antioxidant and anti-inflammatory properties in the body. And when it comes to eye health, antioxidant balance matters because the lens, retina, and ocular surface are sensitive to oxidative stress.
Traditional cultures have used onions as part of wellness routines for centuries. Modern science doesn’t validate every folk claim—but it does help us ask smarter questions. And one smart question is: can onion-rich diets gently support eye comfort and aging resilience?
Let’s explore 12 intriguing possibilities, framed with realistic language and practical takeaways.
The Countdown: 12 Ways Onions May Support Eye Wellness
12) They may support whole-body antioxidant intake
Many eye concerns are linked to oxidative stress over time. Onions contribute antioxidants that may help lower overall oxidative burden. That doesn’t mean your vision changes overnight. It means you’re feeding the systems that protect tissues long-term. And long-term protection is the quiet goal most people ignore.
If you’ve been chasing instant fixes, the next benefit feels more satisfying.
11) They may help calm inflammation pathways
Quercetin is widely studied for anti-inflammatory activity in the body. Inflammation isn’t always dramatic—it can be low-grade and chronic. When your eyes feel irritated often, reducing systemic inflammatory load may support comfort indirectly. Think of it as turning down background noise, not flipping a miracle switch. But wait—because comfort often comes down to tears.
10) They may support tear-film stability through dietary patterns
Dry eye is complex. Tears aren’t just “water.” They’re a layered film with oils, mucus, and electrolytes. While onions aren’t “tear drops,” a diet richer in plant compounds may support healthier mucous membranes for some people. This effect is indirect, but it’s part of why “food as support” is worth exploring. And if your dry eye is triggered by environment, the next benefit matters.
9) They can be a simple “habit anchor” for hydration and meals
Here’s a psychology twist: adding onions often means you’re eating more meals at home. More home meals often means more hydration, better nutrient density, and fewer ultra-processed snacks. That lifestyle shift can reduce eye strain triggers like dehydration and poor sleep. It’s not the onion alone—it’s the routine it creates. And routines are where real change lives.
Now let’s bring this to life with a relatable story.
Case Study 1: “Sarah,” 58, and the Foggy Morning Feeling
Sarah (name changed) is a 58-year-old teacher who loved reading at night. Over time, she noticed a foggy, tired feeling in the mornings, plus dryness by mid-afternoon. She didn’t want to rely on drops constantly, but she also didn’t want risky DIY eye tricks. So she tried something boring and safe: improving her meals.
She started adding onions daily—raw in salads, sautéed with vegetables, and in soups. She described the sensory shift: the crisp bite of red onion in lunch, the sweet softness of caramelized onion at dinner. In a few weeks, she felt less “scratchy” by the end of the day. Not perfect. Not cured. But improved enough that she kept going. And when she kept going, the next benefit started to matter: consistency.
8) They may support lens and retinal resilience through antioxidant support
The lens and retina are sensitive to oxidative stress. Research discussions around quercetin often focus on antioxidant protection in tissues. Dietary onions won’t “reverse cataracts” or “fix the retina.” But antioxidant-rich patterns may support healthier aging trajectories. And that’s the kind of support that compounds over years.
But some people want something more immediate: irritation relief.
7) They may be helpful in seasonal “allergy-style” discomfort patterns
If your eyes feel itchy during pollen season, inflammation can play a role. Quercetin is often discussed in broader allergy-support conversations due to its anti-inflammatory reputation. This is not a substitute for medical allergy care. But as part of a nutrient-rich diet, it may support comfort for some people. If you’re curious, keep reading—because food is only half the equation.
6) They may encourage you to pair meals with healthy fats
Quercetin and other plant compounds are often better utilized when your diet includes healthy fats. When people add onions to salads, they often add olive oil, avocado, or salmon. That’s great for overall wellness—and omega-3 fats are commonly discussed in dry-eye support. Again, it’s the pattern, not the magic ingredient. But the next benefit gets very practical.
5) They may reduce reliance on sugary snacks that worsen inflammation
You might be thinking, “What does sugar have to do with eyes?” High-sugar diets can promote inflammation and dehydration. When you eat more savory, fiber-rich meals with onions, you may snack less on sugar. That can support steadier energy, better sleep, and less inflammatory load. And better sleep can make your eyes feel less irritated the next day.
Now let’s pause for a quick engagement check.
Mid-Article Quick Quiz (Don’t Skip This)
Answer in your head: How many potential benefits have we covered so far? What’s your biggest eye complaint: dryness, glare, fogginess, or irritation? Rate your comfort 1–10 again—did your awareness change? Are you ready for the “what to actually do” part? Yes or no.
If you’re still here, you’re in the small group that doesn’t just skim. And that’s perfect, because the next benefits are the ones most people can use immediately.
4) They may support ocular surface comfort indirectly through gut health patterns
A balanced gut and nutrient absorption matter for skin and mucous membranes. Onions contain fibers that can support beneficial gut bacteria for some people. Better gut patterns may support nutrient absorption, which supports tissues overall. This isn’t a quick fix—but it’s a smart foundation. And foundations make the next steps work better.
3) They may contribute sulfur compounds that support antioxidant systems
Onions contain sulfur-related compounds associated with antioxidant pathways. This is part of why onions are studied beyond just flavor. When antioxidant systems are supported, tissues may handle stress better—UV, screens, pollution. And if screens are your main enemy, the next point matters.
2) They can pair beautifully with “eye-friendly” foods
Onions are easy to combine with proven nutrient-dense foods: leafy greens, eggs, salmon, citrus, beans. Those foods contain lutein, zeaxanthin, omega-3s, vitamin C, and zinc—nutrients commonly associated with eye health support. So onions can function like a gateway habit: you use them, you cook more, you upgrade your plate. And that leads to the #1 benefit—the one that can feel life-changing without being dramatic.
1) They help you take control with a safe, repeatable routine
The biggest win isn’t a miracle effect. It’s the feeling that you’re doing something safe, affordable, and consistent. When you stop chasing risky hacks and start building a supportive pattern, anxiety drops. And lower stress can improve sleep, dryness, and overall comfort. That sense of control is often what people call “transformative.”
Now let’s make it practical with clear guidance and safety boundaries.
The Practical Way to Use Onions for Eye Wellness (Safely)
Here are safe, realistic strategies:
Aim for daily intake, not massive doses: add onion to one meal per day.
Choose varieties strategically: red and yellow onions are commonly discussed as higher in quercetin than some other types.
Use both raw and cooked: raw keeps a sharper bite; cooked becomes sweet and easy to eat.
Balance with hydration: dry eyes and dehydration often travel together.
And here’s what to avoid:
No direct onion juice in the eyes.
No rubbing onion on eyelids if you’re sensitive.
No replacing prescribed eye treatment with food strategies.
Table 1: Onion-Based Support vs. Other Options
Approach
Pros
Cons
Best For
Eating onions daily
Affordable, safe, nutrient-rich
Gradual results, taste adjustment
Long-term wellness support
Quercetin supplements
Convenient
Dosing varies, interactions possible
Those advised by a clinician
Artificial tears
Symptom relief
Doesn’t address lifestyle triggers
Dry eye symptom management
Professional eye evaluation
Highest accuracy
Time/cost
Persistent or worsening symptoms
Table 2: Simple “30-Day Eye Comfort Plan”
Week
What to Do
What You Might Notice
1
Add onions to 1 meal/day + drink extra water
Slightly less “scratchy” feeling
2
Pair onions with omega-3 foods 2–3x/week
More stable comfort late day
3
Reduce screen breaks + improve sleep routine
Less fatigue, fewer headaches
4
Keep pattern + track symptoms 1–2x/week
Clearer trend awareness
Your Call to Action: Start With One Safe Step Tonight
If you want to test this gently, do this today: Add red onion to a salad with olive oil, or sauté onion into your dinner vegetables. Then track your eye comfort score (1–10) twice per week for a month. Not daily—daily tracking makes people anxious. Trend tracking creates calm.
And if you have persistent dryness, pain, sudden vision changes, flashes, floaters, or worsening blur, don’t wait. Those deserve professional evaluation—no food tip should delay care.
P.S. The “insider move” isn’t onion juice. It’s the trio: nutrient-dense meals + hydration + screen breaks. Onions simply make the first part easier because they upgrade flavor and keep you cooking at home.
This article is for informational purposes only and does not replace professional medical advice. Consult your healthcare provider for personalized guidance, especially if you have eye conditions. Direct onion juice in eyes may irritate—avoid.


.jpg)


